Battery switch on travel trailer function is crucial for managing your RV’s power. Understanding how these switches work – whether single-pole, double-pole, or double-pole double-throw – is key to safely operating your travel trailer’s electrical system. This guide will walk you through different switch types, safe connection and disconnection procedures, troubleshooting tips, and even upgrading options, empowering you to confidently handle your RV’s power needs.
We’ll cover everything from the basics of how the switch interacts with your converter, inverter, and shore power to more advanced topics like selecting the right amperage for your replacement switch. We’ll also delve into common problems and provide clear, step-by-step solutions to get you back on the road quickly. Get ready to become a power management pro!
Connecting and Disconnecting Batteries
Properly connecting and disconnecting your travel trailer’s batteries using a battery switch is crucial for safety and maintaining your battery system’s longevity. This process involves a few simple steps, but adhering to safety precautions is paramount.
A battery switch allows you to isolate your batteries, preventing accidental drain or short circuits. This is especially helpful when storing your trailer for extended periods or when working on the electrical system.
Safe Battery Connection Procedure
Connecting your batteries involves a specific sequence to ensure a safe and efficient connection. Always follow these steps to avoid sparks or accidental shorts.
- Ensure the Battery Switch is OFF: Before touching any wires or terminals, always verify that the battery switch is in the “OFF” position. This isolates the batteries from the trailer’s electrical system.
- Inspect Battery Terminals: Check the battery terminals for corrosion. Clean any corrosion with a wire brush and baking soda solution. Ensure the terminals are tight and secure.
- Connect the Positive (+) Cable: Attach the positive (+) cable to the positive (+) terminal of the battery. Make sure the connection is snug and secure.
- Connect the Negative (-) Cable: Attach the negative (-) cable to the negative (-) terminal of the battery. Again, ensure a tight connection.
- Turn the Battery Switch ON: Once both cables are securely connected, carefully turn the battery switch to the “ON” position.
Safe Battery Disconnection Procedure
Disconnecting your batteries requires the reverse procedure, but safety remains the top priority. Following these steps will help prevent accidental shocks or damage.
- Turn the Battery Switch OFF: Before disconnecting any cables, turn the battery switch to the “OFF” position. This will isolate the batteries.
- Disconnect the Negative (-) Cable: First, disconnect the negative (-) cable from the battery terminal.
- Disconnect the Positive (+) Cable: Next, disconnect the positive (+) cable from the battery terminal.
Maintaining Battery Connections
Regular maintenance of your battery connections is key to preventing corrosion and ensuring reliable performance. This simple practice can extend the lifespan of your batteries and avoid unexpected electrical issues.
- Regular Cleaning: Inspect your battery terminals regularly (at least every three months) for corrosion. Clean any corrosion using a wire brush and a baking soda solution. A mixture of baking soda and water creates a paste that effectively neutralizes battery acid.
- Terminal Protection: Consider using a battery terminal protector or anti-corrosion grease to prevent future corrosion buildup.
- Tight Connections: Ensure all connections are tight and secure. Loose connections can lead to increased resistance and corrosion.
Safety Precautions When Working with Batteries
Batteries contain corrosive chemicals and can produce explosive gases. Always prioritize safety when working with them.
- Eye Protection: Wear safety glasses to protect your eyes from splashes of battery acid.
- Ventilation: Work in a well-ventilated area to avoid inhaling potentially harmful gases.
- Gloves: Wear gloves to protect your hands from battery acid.
- No Open Flames: Avoid open flames or sparks near batteries, as hydrogen gas can be explosive.
Visual Guide for Connecting and Disconnecting Batteries
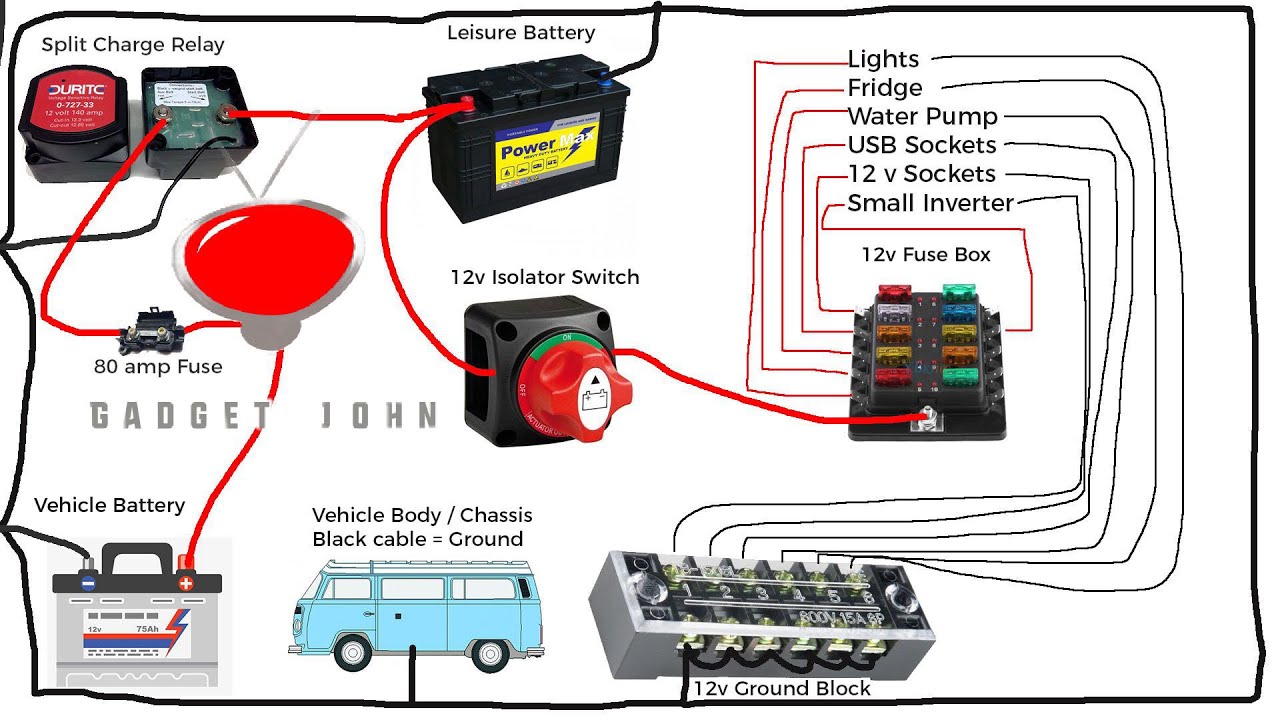
Imagine a diagram. The diagram shows two batteries, clearly labeled “Battery 1” and “Battery 2,” each with a positive (+) red terminal and a negative (-) black terminal. Thick red and black wires represent the positive and negative cables respectively. Arrows indicate the order of connection and disconnection. The battery switch is depicted with three positions: “OFF,” “Battery 1,” and “Battery 2.” The “OFF” position is shown in light gray, while “Battery 1” and “Battery 2” are shown in their respective battery colors (red and black).
Green checkmarks indicate successful connections, and red X’s indicate disconnections. Clear labels highlight each step in the process.
Troubleshooting Common Battery Switch Issues
Your travel trailer’s battery switch is a crucial component, ensuring you have power when you need it. Problems with this switch can leave you stranded, so understanding how to troubleshoot them is essential. This section Artikels common issues, their causes, and steps to resolve them.
Common Battery Switch Problems and Their Causes
Several issues can arise with your travel trailer’s battery switch. The most frequent problems involve a complete lack of power, intermittent power fluctuations, or blown fuses. These problems usually stem from one of three main sources: wiring issues, a faulty switch itself, or problems with the batteries being switched.
Troubleshooting Steps: A Flowchart Approach
To efficiently diagnose and fix battery switch problems, a systematic approach is helpful. The following flowchart guides you through the process:
Start
↓
Is there any power at all?
→ Yes → Proceed to “Intermittent Power” section below.
→ No → Check fuses. If blown, replace and retest. If still no power, proceed to the next step.
↓
Check the battery connections. Are they clean and tight?
→ Yes → Check the switch itself for any obvious damage or corrosion. If found, replace the switch. If no damage is found, inspect the wiring for breaks or loose connections.
→ No → Clean and tighten battery terminals. Retest. If the problem persists, proceed to the next step.
↓
Inspect wiring for breaks, loose connections, or corrosion.
So, you’re hitting the road in your travel trailer? Awesome! First things first: learn how to use your battery switch – check out this guide on the battery switch on travel trailer function to avoid any dead-battery surprises. Once you’ve got the power sorted, it’s time to think about entertainment. For those of you who appreciate quality sound, setting up an audiophile travel aetup is totally doable, even in a smaller space.
Think portable speakers, noise-canceling headphones, and maybe even a mini-amplifier for that perfect road trip soundtrack.
→ Issues found → Repair or replace damaged wiring. Retest.
So, you’re gearing up for a road trip? Awesome! First things first: make sure you understand your travel trailer’s power system. Check out this guide on the battery switch on travel trailer function to avoid any dead-battery surprises. Once you’ve got that sorted, you can focus on the fun stuff, like setting up your amazing audiophile travel setup for those epic sunset jams.
Proper power management and killer tunes – the perfect recipe for an unforgettable adventure!
→ No issues found → The switch itself may be faulty. Replace the switch and retest.
↓
Test the batteries. Are they charged and functioning correctly?
→ Yes → Problem likely resolved. If not, consult a professional.
→ No → Charge or replace batteries as needed. Retest.
↓
End
Intermittent Power Issues
Experiencing intermittent power suggests a more subtle problem. This often involves loose connections, corroded terminals, or a failing switch that makes inconsistent contact.
Common Causes and Troubleshooting Steps
A comprehensive list detailing the most frequent causes of battery switch malfunctions and their corresponding solutions is essential for effective troubleshooting.
Before proceeding, remember to always disconnect the negative battery terminal before working on any electrical components. Safety first!
- Problem: No power to the trailer. Cause: Blown fuse. Troubleshooting: Check the fuse box for a blown fuse. Replace the fuse with one of the same amperage rating. Retest.
- Problem: No power to the trailer. Cause: Loose or corroded battery terminals. Troubleshooting: Clean the terminals with a wire brush and baking soda solution. Tighten the connections. Retest.
- Problem: No power to the trailer. Cause: Faulty battery switch. Troubleshooting: Visually inspect the switch for damage. If damaged, replace the switch. Retest.
- Problem: Intermittent power. Cause: Loose wiring connections. Troubleshooting: Inspect all wiring connections for looseness. Tighten any loose connections. Retest.
- Problem: Intermittent power. Cause: Corroded wiring. Troubleshooting: Inspect wiring for corrosion. Clean or replace corroded wiring. Retest.
- Problem: Dead batteries. Cause: Batteries are discharged or faulty. Troubleshooting: Check the voltage of the batteries. Charge or replace as needed. Retest.
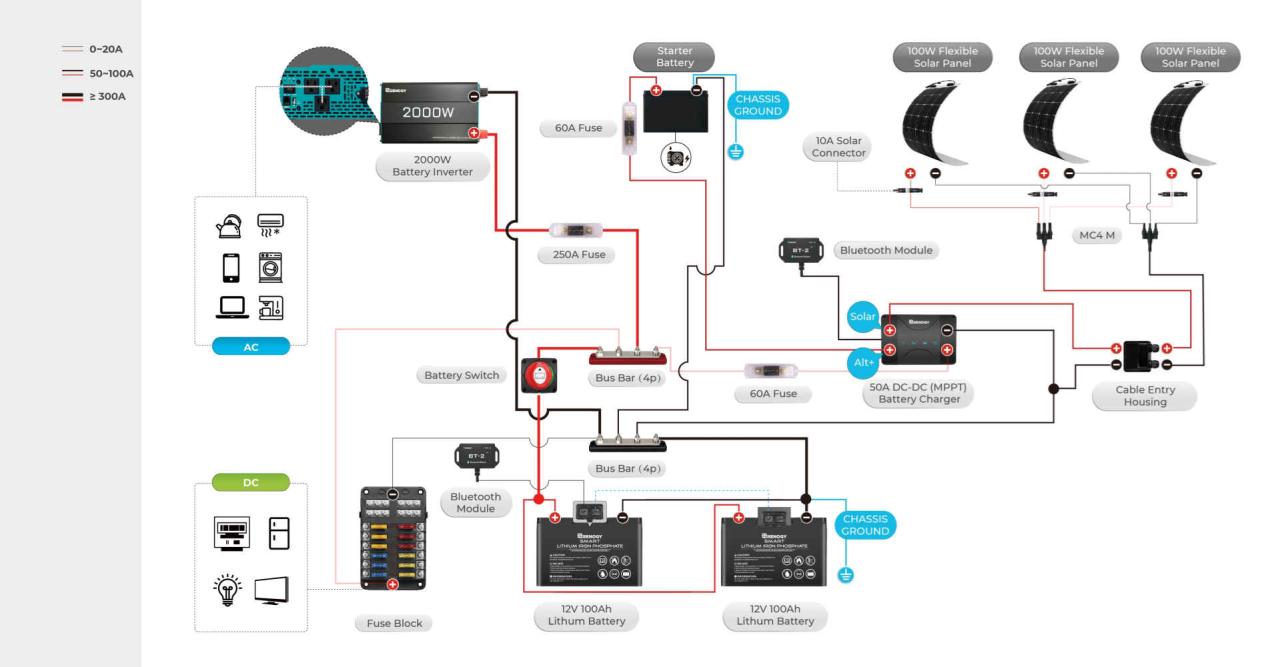
Battery Switch and Electrical System Integration
Your battery switch is the central nervous system of your travel trailer’s DC power, controlling the flow of electricity from your batteries to various components. Understanding how it interacts with other parts of the electrical system is key to preventing issues and maximizing your power usage. This section explains the power flow with and without the switch engaged, and how different switch configurations impact performance.The battery switch acts as a gatekeeper, selectively routing power from your batteries to the rest of your trailer’s 12V DC system.
When engaged, it allows power to flow from your batteries to power devices like lights, water pumps, and the 12V outlets. This power then feeds into the converter, which transforms 12V DC to 120V AC to power your household appliances. If you’re using an inverter, it draws power from the batteries to convert 12V DC to 120V AC, offering another path for AC power within your trailer.
Shore power, when connected, bypasses the battery switch and feeds directly into the converter and AC outlets. When the battery switch is off, the batteries are isolated, preventing accidental discharge and protecting your batteries from potential damage.
Power Flow with and Without Battery Switch Engaged
With the battery switch engaged, power flows directly from the batteries to the 12V DC system. The converter draws power from the batteries to produce 120V AC power for appliances. The inverter, if present, also draws power from the batteries to create 120V AC power. If shore power is connected, the converter receives power directly from the shore power, bypassing the batteries.
With the battery switch off, the batteries are completely disconnected from the rest of the system. No power flows from the batteries, and the 12V DC system remains inactive unless shore power is supplying 120V AC which is then converted to 12V DC via the converter.
Impact of Different Battery Switch Configurations
Different battery switch configurations impact power flow and system efficiency. A simple on/off switch provides basic control. More sophisticated switches, such as those with multiple banks (e.g., for dual batteries), allow for selective charging and usage of different battery banks. Using a dual-battery setup with a properly configured switch allows you to extend your off-grid time by switching between batteries.
A poorly configured system, however, could lead to unexpected power drain or failure to charge certain battery banks properly. For example, if a dual battery system is improperly wired, one battery might be continuously drained while the other remains unused. Efficient configurations involve using a battery switch that allows for isolating individual batteries for maintenance or charging, and a charging system that handles multiple batteries effectively.
Simplified Schematic Diagram of a Travel Trailer’s Electrical System
Imagine a simple diagram. On the left, we have two battery symbols (representing a dual battery setup), each connected to a positive (+) and negative (-) terminal. These terminals are connected to a dual battery switch. The switch has three positions: OFF, BATTERY 1, and BATTERY 2. From the output of the switch, a single positive wire runs to a fuse box.
From the fuse box, multiple wires branch out to various 12V DC appliances (lights, water pump, etc.). Another wire from the fuse box connects to the converter. The converter has an input for 12V DC (from the battery switch) and an output for 120V AC. The 120V AC output feeds the AC outlets and appliances. A separate wire from the batteries connects to an inverter.
The inverter also takes 12V DC and outputs 120V AC. Finally, a shore power input connects directly to the converter, bypassing the battery switch and feeding the AC system directly when plugged into an external power source. The negative (-) wires from all components eventually connect to the chassis ground, completing the circuit. The fuse box protects individual circuits from overloads.
This schematic demonstrates how the battery switch controls the flow of DC power from the batteries to the rest of the system, and how shore power provides an alternative power source.
Upgrading or Replacing a Battery Switch: Battery Switch On Travel Trailer Function
Upgrading or replacing your travel trailer’s battery switch can significantly improve your electrical system’s performance and reliability. Whether you’re dealing with a faulty switch or simply want to enhance your setup, understanding the process and making informed choices is key. This section will guide you through safely upgrading or replacing your battery switch.
Selecting a Replacement Battery Switch
Choosing the right replacement battery switch involves considering several key specifications. The most crucial factor is the amperage rating. This should match or exceed the amperage draw of your largest appliance or device. For example, if your air conditioner draws 20 amps, your switch should be rated for at least 20 amps, ideally higher to provide a safety margin.
Other important considerations include the switch’s mounting style (panel mount, surface mount, etc.), the number of batteries it can handle (typically 1-2 or more for larger setups), and its voltage rating (usually 12V for most travel trailers). Look for switches made from durable materials that can withstand the rigors of travel and exposure to the elements. Consider features like a built-in circuit breaker for added protection against overloads.
Benefits and Drawbacks of Upgrading to Advanced Battery Switches
Upgrading to a more advanced battery switch offers several potential benefits. Remote switches allow you to control your battery power from a convenient location inside your trailer, eliminating the need to reach under the trailer. Smart switches offer even more advanced features, such as monitoring battery voltage and state of charge, providing alerts, and even integrating with other smart home systems.
However, these advanced switches often come with a higher price tag. Remote switches may require additional wiring, adding to the installation complexity. Smart switches require a power source and potentially a wireless connection, adding another layer of considerations. The added features might not be necessary for all users, and the extra cost might not be justified depending on your needs and budget.
Step-by-Step Checklist for Installing a New Battery Switch, Battery switch on travel trailer function
Proper installation is crucial for safety and functionality. Always disconnect the negative battery terminal before starting any work on your electrical system. This is a critical safety precaution to prevent accidental shocks or short circuits.
- Gather Tools and Materials: You’ll need a new battery switch, appropriate wiring (consider gauge based on amperage), wire connectors, a screwdriver (or drill if necessary), wire strippers/cutters, electrical tape, and a multimeter (for testing).
- Disconnect Batteries: Disconnect the negative terminal of your battery or batteries.
- Remove Old Switch: Carefully remove the old battery switch, taking note of the wiring configuration before disconnecting any wires. Take pictures if necessary.
- Prepare New Switch: Mount the new battery switch in its designated location. Ensure it is securely fastened.
- Connect Wiring: Carefully connect the wires to the new switch, matching the configuration of the old switch. Use appropriate wire connectors and ensure all connections are secure and properly insulated.
- Test the Switch: Reconnect the negative battery terminal. Use the multimeter to test the voltage at various points in the system to ensure the switch is functioning correctly. Test all circuits and loads to ensure they are properly powered.
- Secure Wiring: Secure all wiring neatly and safely, using cable ties or other appropriate methods to prevent loose wires.
Mastering your travel trailer’s battery switch is all about safety and efficiency. By understanding the different types of switches, practicing safe connection and disconnection, and knowing how to troubleshoot common problems, you’ll ensure a smooth and reliable power supply for all your adventures. Remember to always prioritize safety when working with electricity and consult a professional if you’re unsure about any step.
Happy travels!
Frequently Asked Questions
What size battery switch do I need?
The correct size depends on your battery bank’s amperage. Choose a switch with an amperage rating equal to or greater than your battery bank’s total amperage.
How often should I clean my battery terminals?
Clean your battery terminals at least twice a year, or more often if you notice corrosion.
My battery switch is making a clicking sound. What’s wrong?
A clicking sound often indicates a faulty switch or a low battery voltage. Check your battery voltage and consider replacing the switch.
Can I use a battery switch with a lithium battery system?
Yes, but you may need a specific switch designed for lithium batteries. Consult the manufacturer’s recommendations.
